
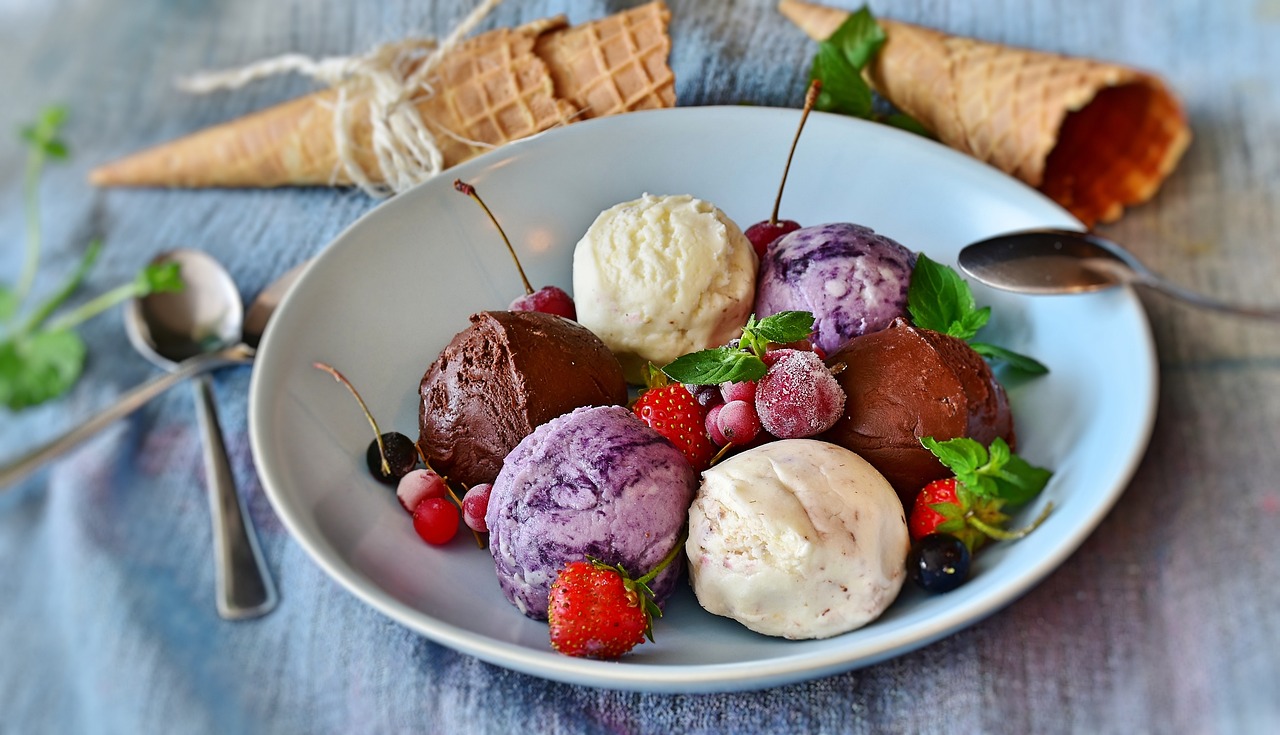
Discover easy and delicious ways how to make ice cream without ice cream maker. Learn various methods, from using a freezer or blender to creative no-churn recipes, for a creamy, homemade treat.
Ice cream is a beloved treat which is enjoyed by all ages of people across the globe. It’s creamy, sweet, and offers a refreshing escape from the heat, making it a go-to dessert during the summer months. While store-bought ice cream is convenient, making ice cream at home allows for creativity, control over ingredients, and a rewarding experience.
Table of Contents
How to Make Ice Cream
Many people think that making ice cream at home requires an ice cream maker, which can be an expensive and bulky appliance. Thankfully, this is a myth! You can make delicious, creamy ice cream without an ice cream maker using various methods. This comprehensive guide will explore multiple techniques, tips, and recipes to make ice cream without an ice cream maker, so you can enjoy homemade ice cream anytime.
Why Make Ice Cream at Home?
Before diving into the methods of making ice cream without an ice cream maker, let’s discuss the benefits of homemade ice cream.
1. **Customization**: When you make ice cream at home, you can customize it to your taste. Want extra chocolate chips? Go for it. Prefer a dairy-free option? You can make it happen. The possibilities are endless.
2. **Quality Control**: Making ice cream at home allows you to control the ingredients. You can choose high-quality ingredients, avoid artificial additives, and adjust the sugar content to your liking.
3. **Healthier Options**: Homemade ice cream can be healthier than store-bought varieties. You can opt for natural sweeteners, use fresh fruit, and avoid preservatives and stabilizers often found in commercial ice cream.
4. **Creative Flavors**: Store-bought ice cream flavors are limited to what’s available in the market. When you make your own, you can experiment with unique flavors, such as lavender honey, olive oil, or basil mint.
5. **Fun and Educational**: Making ice cream can be a fun activity to do with family and friends. It’s also a great way to learn about the science behind freezing and emulsification.
The Science Behind Ice Cream
To understand how to make ice cream without a machine, it’s helpful to know the science behind it. Ice cream is essentially a frozen emulsion of fat, sugar, and water. The goal of any ice cream-making process is to create a smooth texture by preventing large ice crystals from forming.
Commercial ice cream makers achieve this by continuously churning the mixture while it freezes. This churning process incorporates air into the ice cream and breaks up ice crystals as they form, resulting in a creamy texture. Without an ice cream maker, we must find other ways to incorporate air and prevent large ice crystals from forming.
Key Ingredients in Ice Cream
1. **Dairy**: Most traditional ice creams are made with a combination of heavy cream and milk. The fat content in the cream is crucial for creating a rich, smooth texture. Milk adds water, which needs to be carefully managed to prevent ice crystal formation.
2. **Sugar**: Sugar sweetens the ice cream and lowers the freezing point of the mixture, which helps keep the texture soft and scoopable.
3. **Egg Yolks**: In custard-based ice creams, egg yolks act as an emulsifier, creating a smooth, creamy texture. The proteins in the egg yolks also help stabilize the mixture.
4. **Flavorings**: Vanilla, chocolate, fruit, nuts, and other flavorings give ice cream its unique taste.
5. **Stabilizers**: Some recipes use stabilizers like gelatin, cornstarch, or xanthan gum to help maintain a smooth texture.
How to Make Ice Cream Without Ice Cream Maker
Now that we’ve covered the basics of ice cream, let’s explore different methods to make it without an ice cream maker.
1. The Freezer Method
The simplest way to make ice cream without a machine is to use your freezer. This method involves mixing the ingredients, placing the mixture in a container, and freezing it.
**Ingredients:**
– 2 cups heavy cream
– 1 cup whole milk
– 3/4 cup sugar
– 1 tablespoon vanilla extract
**Instructions:**
1. **Mix Ingredients**: In a large bowl, whisk together the heavy cream, whole milk, sugar, and vanilla extract until the sugar is dissolved.
2. **Freeze and Stir**: Pour the mixture into a shallow container, such as a metal loaf pan or a glass baking dish. Place the container in the freezer for about 30 minutes. Remove it from the freezer and stir the mixture with a fork or whisk to break up any ice crystals that have started to form. Return it to the freezer.
3. **Repeat**: Continue freezing the mixture, stirring every 30 minutes, until the ice cream is firm but scoopable. This process usually takes about 3-4 hours.
4. **Serve**: Once the ice cream has reached the desired consistency, serve it immediately or store it in an airtight container in the freezer for up to two weeks.
**Tips:**
– Use a shallow container to help the mixture freeze more quickly and evenly.
– Stirring frequently is crucial to prevent large ice crystals from forming and to incorporate air into the mixture.
– For added texture and flavor, fold in mix-ins like chocolate chips, nuts, or fruit after the first hour of freezing.
2. The Whipped Cream Method
This method uses whipped cream to create a light, airy texture without churning. The whipped cream traps air, mimicking the effect of an ice cream maker.
**Ingredients:**
– 2 cups heavy cream
– 1 can (14 ounces) sweetened condensed milk
– 1 tablespoon vanilla extract
**Instructions:**
1. **Whip the Cream**: In a large bowl, whip the heavy cream with an electric mixer or a whisk until stiff peaks form.
2. **Fold in Condensed Milk**: Gently fold the sweetened condensed milk and vanilla extract into the whipped cream until fully combined.
3. **Freeze**: Pour the mixture into a loaf pan or another container. Cover with a lid or plastic wrap and freeze it for at least 4 hours or until firm.
4. **Serve**: Scoop and serve the ice cream directly from the freezer. This ice cream is best enjoyed within a week of making it.
**Tips:**
– Be gentle when folding in the condensed milk to avoid deflating the whipped cream.
– For chocolate ice cream, add 1/2 cup of cocoa powder to the condensed milk before folding it into the whipped cream.
– Add mix-ins like crushed cookies, caramel swirls, or fruit puree before freezing for a personalized touch.
3. The Blender Method
The blender method is a quick and easy way to make ice cream without an ice cream maker. This method uses frozen fruit and a blender to create a creamy texture.
**Ingredients:**
– 2 cups frozen fruit (such as strawberries, mango, or bananas)
– 1/2 cup of whole milk or dairy-free milk
– 2-4 tablespoons sugar or honey (optional)
**Instructions:**
1. **Blend Ingredients**: In a high-speed blender, combine the frozen fruit, milk, and sugar or honey if using. Blend it until creamy and smooth, scraping down the sides as needed.
2. **Freeze**: Pour the mixture into a container and freeze for about 2 hours or until firm.
3. **Serve**: Scoop and enjoy! This ice cream is best enjoyed the same day it’s made.
**Tips:**
– Try to use ripe and sweet fruit to get the best flavor.
– You can substitute the milk with yogurt for a tangier flavor and creamier texture.
– For a softer texture, serve the ice cream immediately after blending.
4. The Bag Method
The bag method is a fun, hands-on way to make ice cream, especially popular with kids. It uses ice and salt to freeze the mixture quickly.
**Ingredients:**
– 1 cup heavy cream
– 1 cup whole milk
– 1/2 cup sugar
– 1 teaspoon vanilla extract
– Ice
– 1/2 cup of rock salt
**Instructions:**
1. **Prepare the Ice Cream Mixture**: In a medium bowl, whisk together the heavy cream, milk, sugar, and vanilla extract until the sugar is dissolved.
2. **Fill the Bags**: Pour the mixture into a quart-sized resealable plastic bag. Tightly seal the bag by removing air as much as possible.
3. **Prepare the Ice and Salt**: In a gallon-sized resealable plastic bag, add ice until it is half full. Add the rock salt to the ice.
4. **Shake the Bags**: Place the quart-sized bag with the ice cream mixture into the gallon-sized bag with ice and salt. Seal the larger bag tightly. Shake the bags for about 5-10 minutes or the ice cream mixture until thickens.
5. **Serve**: Remove the inner bag, wipe off any salt, and scoop the ice cream into bowls. Serve immediately.
**Tips:**
– For extra insulation, double bag the ice cream mixture to prevent any salty water from seeping in.
– Wear gloves or use a towel to protect your hands while shaking the bag, as it gets very cold.
– Experiment with flavors by adding chocolate chips, fruit, or other mix-ins to the ice cream mixture before shaking.
5. The Food Processor Method
The food processor method is similar to the blender method but offers a different texture and is excellent for making rich, custard-based ice cream.
**Ingredients:**
– 1 cup heavy cream
– 1 cup whole milk
– 3/4 cup sugar
– 1 teaspoon vanilla extract
– 4 egg yolks
**Instructions:**
1. **Make the Custard**: In a saucepan over medium heat, combine the milk and cream.
Heat the mixture until steaming but not boiling.
2. **Temper the Eggs**: In a separate bowl, whisk the egg yolks and sugar together until pale and thick. Slowly add the hot milk mixture to the egg yolks, whisking constantly.
3. **Cook the Custard**: Return the mixture to the saucepan and cook over medium-low heat, stirring constantly, until the mixture thickens and coats the back of a spoon. Do not let it boil.
4. **Chill the Custard**: Remove from heat and stir in the vanilla extract. Cool the custard in an ice bath or in the refrigerator until completely chilled.
5. **Freeze the Custard**: Pour the chilled custard into a shallow dish and freeze for about 2 hours or until partially frozen.
6. **Process the Custard**: Break the partially frozen custard into chunks and place them in a food processor. Process until smooth and creamy.
7. **Final Freeze**: Pour the smooth custard into a container and freeze for an additional 2-3 hours or until firm.
8. **Serve**: Scoop and serve the ice cream. It’s best enjoyed within a week.
**Tips:**
– Ensure the custard is completely chilled before freezing to prevent ice crystals from forming.
– The food processor method works best with custard-based ice cream, as it provides a rich, creamy texture.
– For a more intense flavor, add mix-ins like chocolate or fruit before the final freeze.
Flavor Variations and Mix-Ins
Once you master the basic methods of making ice cream without an ice cream maker, the fun begins with flavor variations and mix-ins. Here are some ideas to get you started:
Classic Vanilla
**Ingredients:**
– Use any of the base recipes above
– Add 1 tablespoon of vanilla bean paste or the seeds from 1 vanilla bean for a richer vanilla flavor
**Instructions:**
– Follow the chosen method’s instructions, adding the vanilla paste or seeds with the other ingredients.
Chocolate Lovers
**Ingredients:**
– Use any of the base recipes above
– Add 1/2 cup of cocoa powder and 1/2 cup of chocolate chips
**Instructions:**
– Add the cocoa powder to the milk mixture and whisk until fully incorporated. Fold in the chocolate chips before freezing.
Fresh Fruit
**Ingredients:**
– Use any of the base recipes above
– Add 1 cup of fresh fruit puree or chopped fruit (such as strawberries, mango, or peaches)
**Instructions:**
– Stir the fruit puree or chopped fruit into the ice cream mixture before freezing. For a swirl effect, add the puree in layers and gently swirl with a knife.
Nutty Delight
**Ingredients:**
– Use any of the base recipes above
– Add 1/2 cup of chopped nuts (such as almonds, pecans, or pistachios)
**Instructions:**
– Fold the chopped nuts into the ice cream mixture before freezing for added crunch and flavor.
Caramel Swirl
**Ingredients:**
– Use any of the base recipes above
– Add 1/2 cup of caramel sauce
**Instructions:**
– Add the caramel sauce in layers to the ice cream mixture and gently swirl with a knife before freezing.
Dairy-Free and Vegan Options
For those who are lactose intolerant, vegan, or simply looking for a lighter option, there are plenty of ways to make dairy-free ice cream without an ice cream maker. Here are a few methods:
Coconut Milk Ice Cream
Coconut milk is a great substitute for dairy as it has a high-fat content, similar to heavy cream.
**Ingredients:**
– 2 cans (13.5 ounces each) full-fat coconut milk
– 3/4 cup sugar or maple syrup
– 1 tablespoon vanilla extract
**Instructions:**
1. **Mix Ingredients**: Whisk together the coconut milk, sugar or maple syrup, and vanilla extract in a large bowl.
2. **Freeze and Stir**: Pour the mixture into a shallow container and freeze, stirring every 30 minutes, until firm but scoopable.
3. **Serve**: Once the ice cream has reached the desired consistency, serve immediately or store it in an airtight container in the freezer.
**Tips:**
– Use full-fat coconut milk for a creamier texture, .
– Add mix-ins like shredded coconut, chocolate chips, or fruit for extra flavor.
Banana Nice Cream
Banana “nice cream” is a popular vegan alternative that uses frozen bananas to create a creamy, ice cream-like texture.
**Ingredients:**
– 4 ripe bananas, sliced and frozen
– 1/4 cup of almond milk or any types of dairy-free milk
– Optional add-ins: cocoa powder, peanut butter, vanilla extract
**Instructions:**
1. **Blend Ingredients**: Place the frozen banana slices and almond milk in a blender or food processor. Blend until smooth and creamy.
2. **Add Flavors**: Add any desired add-ins like cocoa powder, peanut butter, or vanilla extract and blend until fully incorporated.
3. **Serve**: Scoop the banana nice cream into bowls and enjoy immediately.
**Tips:**
– Use ripe bananas for the sweetest flavor.
– For a firmer texture, freeze the banana nice cream for about 1 hour before serving.
Tips for the Best Homemade Ice Cream
Making ice cream without an ice cream maker can be easy and fun with the right tips and tricks:
1. **Use High-Quality Ingredients**: The flavor of your ice cream will depend on the quality of your ingredients. Use fresh, high-quality cream, milk, and flavorings for the best results.
2. **Chill Your Ingredients**: Start with chilled ingredients to help the ice cream freeze faster and minimize ice crystal formation.
3. **Don’t Overmix**: When using methods that require mixing or folding, be gentle to avoid deflating any incorporated air.
4. **Freeze in a Shallow Container**: Using a shallow container allows the ice cream to freeze more quickly and evenly, preventing large ice crystals from forming.
5. **Experiment with Flavors**: Don’t be afraid to get creative with your ice cream flavors. Try adding spices, herbs, or unique mix-ins for a personalized touch.
6. **Store Properly**: Store homemade ice cream in an airtight container in the coldest part of your freezer to maintain its texture and flavor. Place a plastic wrap on the surface of the ice cream to prevent making ice crystals from forming.
7. **Serve at the Right Temperature**: Homemade ice cream can be firmer than store-bought varieties. Let it sit at room temperature for a few minutes before scooping for the best texture.
Conclusion
To make ice cream without an ice cream maker is a enjoyable experience. With these methods and tips, you can create delicious, creamy ice cream in the comfort of your own kitchen, no special equipment required. Whether you prefer classic flavors or unique combinations, the possibilities are endless when it comes to homemade ice cream. So grab your ingredients, roll up your sleeves, and get ready to enjoy the sweet taste of homemade ice cream!